TLDR:
- Simple game with Scala Native and Raylib
- Github repo - use the Discussions/Issues if you have any comments
- Tweet - if you have questions or comments
The toddlerkind doesn't play by human rules. Their onslaught on productivity, mood, physical integrity of matter, and the fabric of time itself cannot be stopped, nor can it be weakened by demands. It has to be resisted with ingenuity, technology, and snacks.
My particular toddler outright refuses to be in the room when I'm sitting at my desk, insisting that he needs to also be at my desk, and he also needs to bash the keyboard in every way possible. He, of course, doesn't put this understandable desire into words, which would've been much easier on my eardrums.
To maintain the balance of power and our shaky coexistence, I have decided to write a program that will save my Slack and Discord compadres from a barrage of "rrrrrrrwwwwwajajajajajajaj" messages, but will still be entertaining enough to keep him occupied with the keyboard.

Naturally, I gravitated to something I've been eyeballing for a while now - game development library called Raylib, which contains an impressive number of utilities and methods for 2D and 3D graphics, as well as basic window management and input handling. What's even more appealing, is that Raylib itself is purely a C library, making it much easier to invoke from Scala Native. You can read more about why that is in my other post
Game development in Scala
It's worth pointing out, that I have no claim to any expertise in game development. My own gamedev journey ended before it even began 18 years ago, where I placed my dreams in between the pages of a book about Direct3D programming in C++, and slammed the folio shut.
That book is still somewhere in my childhood home thousands of miles away, next to a book about x86 assembly and an empty budgie cage.
But from even my limited understanding, it is clear that Scala is not the prime language for game development (that language is, obviously, C++, which is a great thing for everyone, well done). That said, Scala is a JVM language and as such has access to the (admittedly, very limited) set of Java-based game development libraries:
As long as you temper your appetite and expand your perception of what a game is from "multi-million dollar 3D project with hundreds of developers" to "something visual, graphical, and fun", then you can do lots of things with either of those projects.
There even is a precedent of publishing a game to Steam made with Scala and libgdx. If your inner child is not yet crushed by the drag of day to day, give any of those a go and have fun!
We, on the other hand, won't be needing no virtual machines where we are going - my plan is to make this "game" as self-contained as possible, ideally producing a self-contained binary of reasonable size.
I would be remiss not to mention Indigo - a Scala-first functional 2D game engine for the browser. It has a community, a passionate maintainer, and lots of features. But for the same reason as above I decided to go with a desktop-native approach.
Raylib bindings
Producing Raylib bindings is not a very involved process. Bindings should match the shape and layout of Raylib's functions and structs, and should achieve that by using only the C interop features that Scala Native supports.
Two ingredients we will need for that - the header files from Raylib, and a binding generator.
The headers themselves we will get directly from raylib's repository, but we want to produce bindings to not just the core raylib library, but to its raymath component as well.
To do that, we need to create what I call an amalgam header file (different from what C developers call an amalgam file, which is a single file containing entire library source):
raylib-bindings/raylib-amalgam.h
#include "raylib/src/raylib.h"
#include "raylib/src/raymath.h"
This will ensure that whatever analyses this header file will include definitions from both headers, and treat them as single namespace.
To process this header file we will use sn-bindgen - it's not a coincidence that for the longest time a GIF of Raylib bindings has been the demonstrator for the project's ability.
This project doesn't use a SBT build, we just invoke everything with Scala CLI, so to produce bindings I simply installed the CLI and then ran it to produce the Scala files and the C glue code:
$ bindgen --package raylib --header raylib-bindings/raylib-amalgam.h --scala --multi-file --out raylib-bindings/

$ bindgen --package raylib --header raylib-bindings/raylib-amalgam.h --c --out resources/scala-native/raylib.c --c-import "raylib.h" --c-import "raymath.h"
You can see the generated bindings in the repository.
Game
Our goal will be to represent as much as possible about our game state in the form of an immutable case class, which exposes no mutable fields and all the methods it return a new copy of the state.
Here are some of the components of the state relevant to this post:
import scala.collection.immutable.Queue
import scala.util.Random

case class Game(
    letterAnimations: Option[TimeProcess] = None,
    lettersQueue: Queue[Char] = Queue.empty,
    // ...
    window: Window
)
Isolating side effects
In order to one day be able to write the tests for the game (I'm not going to do it but it's nice to have the possibility), I wanted to start and isolate the various side effectful functions that the game will execute.
There are a few simple ways the game interacts with the outside world:
- Sampling window size
- Getting user input
- Drawing on the screen
Apart from those, the game state should be entirely deterministic and testable.
Let's put those side-effectful functions into a separate trait:
trait Window:
  def getHeight(): Int
  def getWidth(): Int
  def getRawKey(): Int
  def sideEffect[A](f: => A): Unit
Note the mysterious sideEffect function – it'd be extremely tedious to try and wrap every single Raylib API
I'm intending to use. Not only tedious, but also absolutely soul sucking.
By introducing this blackhole wrapper function I can declare entire blocks of my game as side effects, and as long as they don't change the game state, my tests shouldn't care about what happens inside them.
Testing the rendering itself is a much more difficult subject I wouldn't even know how to approach at this point with my limited knowledge.
A canonical implementation of this Window trait delegates to Raylib functions:
object Raylib extends Window:
    override def getHeight(): Int = GetScreenHeight()
    override def getWidth(): Int = GetScreenWidth()
    override def getRawKey(): Int = GetKeyPressed()
    override def sideEffect[A](f: => A): Unit =
      val _ = f
      ()
    override def toString(): String = "Window[Raylib APIs]"
And you can imagine a test implementation that just returns dummy values for get methods
and does nothing with side effects.
By expressing our main game logic class in terms of abstract classes of side effects (rather than directly executing those side effects via Raylib methods) we make small steps towards reducing the surface area of our dependency on Raylib, and making the program more testable in isolation.
Setting up window
With our bindings, the most basic setup that opens a window would look something like this:
import raylib.*

val FPS = 60
val ScreenWidth = 1280
val ScreenHeight = 720

@main def hello =
    InitWindow(ScreenWidth, ScreenHeight, c"Little Fingers")
    SetTargetFPS(FPS)

    while !WindowShouldClose() do
      BeginDrawing()
      // make magic happen
      EndDrawing()
    end while

    CloseWindow()
end hello
For our part, we want to ensure the windows opens in full screen straight away, and that
the Escape key for exit is disabled – as is default in Raylib. The reason we do this is because
the toddler will retaliate by moving and clicking the mouse aggressively, switching away from the window, and then
try to bash the brightly coloured Esc key on my Keychron.
Nobody said the toddlers will give up easily, we must prepare for their devious counter-attacks:
val flags = ConfigFlags.FLAG_WINDOW_RESIZABLE | ConfigFlags.FLAG_VSYNC_HINT

// Notice that Raylib's functions don't actually use the defined enums,
// instead they accept integer values and you are assumed to know which
// set of values is acceptable there
SetConfigFlags(flags.value)

InitWindow(ScreenWidth, ScreenHeight, c"Little Fingers")

MaximizeWindow()

SetTargetFPS(FPS)

SetExitKey(-1)
Main loop
The state of the game is not something that Raylib represents or handles for us – it exists entirely outside of the library machinery.
As mentioned earlier, we will try to keep our game state immutable, and keep the mutability close to the entry point of the program, trying to minimise it, but not fighting against its utility.
To that end, we will allow the Game to render itself, rather than being entirely a pure Game => Game
computation.
So it will look roughly like this:
val colors = Colors()

var gameState = Game(colors = colors, window = Window.Raylib)


inline def updateGame(f: Game => Game) =
  gameState = f(gameState)
  gameState

while !WindowShouldClose() do

  BeginDrawing()
      // 1. draw background
      // 2. advance game state (animations, input, etc.) and draw it
      updateGame(
        _.tick(GetFrameTime())
      )

  EndDrawing()

end while
The tick() method is responsible for advancing all animations (which will render at their own pace),
and updating the internal state of the game.
The animations are represented as time processes, which is what we will talk about next.
Time processes
The extent of my unfamiliarity with frame-by-frame rendering was so severe, that until I watched a YouTube tutorial I really couldn't figure out how I'm supposed to render things evolving smoothly with time.
Here's what was revelatory: using the actual time that has passed since the last frame was drawn and keeping a running sum of those times until you reach the desired "tick rate" – indicating that a next frame in animation can be drawn and the running sum reset to 0. Until the tick rate has been reached, you just keep rendering the same frame of the animation. This way animation is tied to the time it runs ("this letter should appear for 3 seconds") and is decoupled from the FPS.
To generically represent such a time process, we can start with an interface like this:
sealed trait TimeProcess:
  def tick(frameTimeInSeconds: Float): TimeProcess
  def finished(): Boolean
The tick(...) method will be invoked from the main game loop.
To decouple processes from exact time, we will expect to define our animations (or really any time-based processes) with just two parameters:
- Tick rate
- Transition function –
Tick => State, which is how the time process implementation indicates to the genericTimeProcessimplementation when to stop/continue.
State and Tick are self-explanatory:
enum State:
  case Stop, Continue

enum Tick:
  case SameFrame, NextFrame
The construction of that transition function can be as flexible as we need.
For example, if we want to produce an animation that invokes the rendering function with the number of frames that have passed since the animation started, and only does it for a limited number of frames, we can implement it like this:
def limitedFrameTracker(frames: Int)(
    i: Int => State
): Tick => State =
  var frameCnt = 0
  tick =>
    if frameCnt >= frames then State.Stop
    else
      tick match
        case Tick.SameFrame =>
          i(frameCnt)
        case Tick.NextFrame =>
          frameCnt += 1
          i(frameCnt)
end limitedFrameTracker
And if want a ticker – something that just runs once a frame, forever, then it's even easier:
def ticker(i: => Unit): Tick => State =
  tick =>
    tick match
      case Tick.NextFrame =>
        i
        State.Continue
      case _ => State.Continue
This very limited abstraction will allow us to build various time processes, from logging to animations themselves.
A simple implementation of TimeProcess interface can therefore look like this:
private case class SimpleTimeProcess(
    tickRateInMillis: Float,
    // running some of frame times
    start: Float,
    transition: Tick => State,
    // current state
    state: State,
    name: Option[String]
) extends TimeProcess:
  def tick(frameTimeInSeconds: Float): TimeProcess =
    if finished() then this
    else
      val frameTimeInMilliseconds = frameTimeInSeconds * 1000
      val newStart = start + frameTimeInMilliseconds
      if newStart >= tickRateInMillis then
        val state = transition(Tick.NextFrame)
        copy(start = 0.0f, state = state)
      else
        val state = transition(Tick.SameFrame)
        copy(start = newStart, state = state)

  def finished() = state == State.Stop

  override def toString(): String =
    val label = name.getOrElse("<unnamed>")
    val text = if finished() then "stopped" else "running"
    s"Simple[$label: $text]"
end SimpleTimeProcess
I hope the code is clear in what it does. Therefore the simplest time process instantiation looks like this:
def apply(
    tickRate: FiniteDuration,
    name: String | Null = null
)(f: Tick => State): TimeProcess =
  SimpleTimeProcess(
    tickRateInMillis = tickRate.toMillis,
    start = 0.0f,
    transition = f,
    state = State.Continue,
    name = Option(name)
  )
Having this simple implementation allows us to build more complex ones. For example,
what if we want to say animation1.andThen(animation2) and have them execute sequentially?
sealed trait TimeProcess:
  // ...
  def andThen(other: TimeProcess): TimeProcess =
    SequenceTimeProcesses(List(this, other))
And the implementation is quite simple – we just need to peel off the processes that have finished,
all the while not forgetting to tick the currently active animation:
private case class SequenceTimeProcesses(anims: List[TimeProcess])
    extends TimeProcess:
  override def tick(frameTimeInSeconds: Float): TimeProcess =
    anims match
      case head :: next =>
        if head.finished() then copy(anims = next).tick(frameTimeInSeconds)
        else copy(anims = head.tick(frameTimeInSeconds) :: next)

      case Nil => this

  override def finished(): Boolean =
    anims.isEmpty ||
      anims.forall: anim =>
        anim.finished()
end SequenceTimeProcesses
And what the heck – we can make animations run concurrently as well! Just need to tick them all.
private case class ConcurrentTimeProcesses(anims: List[TimeProcess])
    extends TimeProcess:
  override def tick(frameTimeInSeconds: Float): TimeProcess =
    copy(anims = anims.map(_.tick(frameTimeInSeconds)))

  override def finished(): Boolean =
    anims.forall: anim =>
      anim.finished()
This part was honestly so much fun, I didn't really want it to end, but unfortunately all I needed for this is simple time process and the one executing a batch concurrently.
We will show an example of this being used for animations in just a moment, but here's a couple utility loggers used in the app (I'm using Scribe logging library which is excellent):
val printState =
  TimeProcess(1.second, "log state")(
    Animations.ticker(scribe.info(gameState.toString))
  )

val logScreenSize =
  TimeProcess(1.second, "log screen size")(
    Animations.ticker(
      scribe.info(
        s"Screen: ${window.getWidth()}, ${window.getHeight()}"
      )
    )
  )
Handling input
While Raylib can handle several different types of input devices (gamepad, mouse, keyboard), the only controls we have are letter keys.
As the keys get typed, Raylib puts them into an internal queue, from which they can be read by
using GetKeyPressed function. This function will return 0 when there's no more elements in
the internal queue.
We will use this information to drain Raylib's internal queue on each frame, filter out various modifier keys and non-ASCII characters, and copy the remainder into the game's own state.
It's not necessary to do it on each frame (we could stop after finding a single valid key press), but that's how it's currently implemented.
var lastKey = 0
inline def get() =
  val tmp = window.getRawKey()
  if tmp != 0 then lastKey = tmp
  tmp

val chars = List.newBuilder[Char]
var hasAny = false

while get() != 0 do
  if (lastKey >= 'A' && lastKey <= 'Z') || (lastKey >= '0' && lastKey <= '9')
  then
    chars += lastKey.toChar
    hasAny = true
// At this point if `hasAny` is true, we can append `chars.result()` to the game state
This concludes our interaction with the Raylib API for handling input – the remainder of the code deals purely with the internal queue.
Each frame we want to dequeue a letter and schedule an animation for it to run concurrently with any other letters on the screen:
def pickNextLetterFromQueue(): Game =
  when(lettersQueue.dequeueOption): (nextChar, rest) =>
    val nextLetterAnimation = letterAnimation(nextChar)

    val animations =
      letterAnimations
        .map(_.concurrently(nextLetterAnimation))
        .orElse(Some(nextLetterAnimation))

    copy(
      letterAnimations = animations,
      lettersQueue = rest
    )
Now let's see what letterAnimation function actually produces.
Rendering text
The animation for the letter is very simple – it appears in a random part of the screen, it grows over time, and so does the circular halo behind it, then letter disappears and the halo fades away into transparency.
-
First convert the letter to a C string representation that Raylib can understand That's why
Gametakes a givenZoneparameter – to track those allocations. -
The animation will run for 100 frames (eyeballed it) –
limitedFrameTrackeris exactly what we need for this purpose -
We will need to do some extra measurements and position adjustments as the position of the letter should take the font size into account, and the font size will depend on the frame number. Raylib has a function called
MeasureTextExthat returns the size of the string if rendered with a particular font at given size. To get the built-in Raylib's font, we can useGetDefaultFont() -
The actual text can be rendered using
DrawText, and the circular halo usingDrawCircleRaylib functions respectively.
You can see the entire implementation in the source code
Rendering background
The checkered background I lifted straight out of Raylib's examples and it's I think a good demonstration of what C and Scala versions look like side-by-side
The background is first rendered into a known size (initial screen dimensions), and loaded
into the GPU memory. From there we can render it to actual window dimensions (with scaling)
using DrawTexturePro:
val checkedbackground: texture = checkeredbackgroundtexture(
  screenwidth = screenwidth,
  screenheight = screenheight,
  colors = colors
)

while !WindowShouldClose() do

  BeginDrawing()
  DrawTexturePro(
    checkedBackground,
    !Rectangle(
      0,
      0,
      checkedBackground.width.toFloat,
      checkedBackground.height.toFloat
    ),
    !Rectangle(0, 0, GetScreenWidth(), GetScreenHeight()),
    !Vector2(0, 0),
    0,
    !WHITE
  )


  // rest of game update and rendering...

  EndDrawing()

end while
Note that we are dereferencing all the pointers in the function call. When bindgen encounters a raw C struct among the function parameters, which is prohibited by the C interop, it generates two versions – one that takes all struct-like arguments by pointers, and one that takes them all by value:
def DrawTexturePro(
    texture: Ptr[Texture2D],
    source: Ptr[Rectangle],
    dest: Ptr[Rectangle],
    origin: Ptr[Vector2],
    rotation: Float,
    tint: Ptr[Color]
): Unit = ...
  __sn_wrap_raylib_DrawTexturePro(texture, source, dest, origin, rotation, tint)

/** [bindgen] header: ./raylib/src/raylib.h
  */
def DrawTexturePro(
    texture: Texture2D,
    source: Rectangle,
    dest: Rectangle,
    origin: Vector2,
    rotation: Float,
    tint: Color
)(using Zone): Unit = ...
The latter is less efficient as it needs to produce valid pointers to passed arguments,
and it cannot assume that the arguments are safe to be placed on the stack. It's a difficult problem in general, but thankfully Zone in Scala Native is a pointer bump allocator (almost always – it can still request pages from actual system allocator, but it happens very infrequently).
Which function to use depends on the shape of your parameters in a particular application. You can see the sample rendered code on bindgen's Semantics documentation page.
Now that we covered all the interesting bits of the actual code, let's see how to actually build all of this into a binary.
Build setup
As Toto and Dorothy leave the dusty planes of JVM Kansas and enter the unfamiliar, cold world of native applications, they encounter their first hurdle – linking and libraries. A cold world with only a light dusting of asbestos snow.
If you have spent a significant portion of your career in the JVM world, you might be forgiven for occasionally grumbling at having to do one of the following:
- Add a non-standard maven style repository to your build config
- Occasionally use Jitpack.io to bring in a project that doesn't publish to Maven Central
- Figure out some eviction errors etc.
These things can appear soul-crushing in the right context, but they have to be put in context: the jar is there somewhere, you just need to download it, and most of the time that's the end of adding the dependency.
For our project the only library we need is Raylib, which in turn depends on GLFW, both pure C libraries.
When it comes to libraries written in C/C++ there is no jar. There are no distribution repositories. It's just you, a Makefile, a bunch of CMake files, and an almost random assortment of platform-specific flags.
The general problem of building a C/C++ project with no instructions is akin to throwing a bunch of wooden blocks on the floor in the hopes they will assemble into a Jenga tower.
There are attempts to make this space a little less hostile, but the efforts can only go so far with incentives being the opposite of what they are in other distribution models (like Maven or Cargo) where library authors publish their libraries to a (de)centralised repository.
Some libraries are published to system-wide package manager repositories (think APT on Debian or Homebrew on MacOS) -
and if they ship with pkg-config files, it makes configuring flags much easier. Some libraries don't ship that. Most libraries
only ship shared dynamic artifacts, making it impossible to build statically linked binaries without rebuilding the library from source.
Either way, one of the projects that attempts to make dependency management easier is vcpkg, led by Microsoft. What's more important is that a lot of the libraries I tried ship a static linking configuration by default.
Vcpkg and sn-vcpkg
At its core, Vcpkg has a relatively straightforward model:
- Libraries are called "ports"
- They consist of a
cmakescript and any number of patches (yes, actual Git patches, here's an example) that modify the upstream's build to fit in Vcpkg's build process - CMake scripts download the source code, conditionally apply patches, and try to build it
- The
vcpkgdistribution itself is a- Huge Git repository
- A CLI you bootstrap on your system for managing installed ports
Unfortunately, vcpkg ports are not self-contained - if the upstream library
requires system packages to build, then you have to install them separately.
Additionally, you will likely need whatever tools the upstream library needs to build itself:
- One of these probably
zip unzip tar make cmake autoconf pkg-config - ninja build tool very likely
- Python (sometimes particular version) or Ruby
- Perl, obviously
- etc.
Once you accumulate a critical mass of those basic tools, installing packages can
become a matter of just running vcpkg install <library>.
Because my cortex is irreparably damaged by using Scala for everything (from web services to scripts to frontend), the first thought that came to my head when looking at the bootstrap and installation process was "hey, you know what this needs? A Scala wrapper!"
The wrapper exists in the form of SBT and Mill plugins, and a standalone CLI. Yes, you read that right - it's a CLI that eventually invokes another CLI. There's a diagram coming to really drive home the point that I've completely lost my mind.
Scala CLI
Scala CLI is one of the best things that happened to Scala tooling in years. What makes it so great is exactly the fact that it's a Swiss knife of a tool (it's what made Coursier great as well), and I personally believe that the power of it shouldn't be hidden from the users - instead a system of gradual exposure should be used to progressively reveal advanced and possibly experimental features.
One thing Scala CLI currently doesn't expose is a fully fledged Coursier subcommand -
which prevents us from using the extremely useful launch subcommand from Coursier which can download arbitrary JVM dependency and launch its main entrypoint.
For example, launching sn-vcpkg is simply:
$ cs launch com.indoorvivants.vcpkg:sn-vcpkg_3:0.0.19 -- --help
Usage:
    sn-vcpkg install
    sn-vcpkg bootstrap
    sn-vcpkg clang
    sn-vcpkg clang++
    sn-vcpkg scala-cli
    sn-vcpkg pass

Bootstraps and installs vcpkg dependencies in a way compatible with
the build tool plugins for SBT or Mill
...
Or, if you add an app descriptor, it can be just
$ cs launch sn-vcpkg --contrib -- --help
Hopefully one day we will see scala-cli launch.
My own usage of Scala CLI is so frequent, that in the spur of the moment I just added it as a subcommand to
sn-vcpkg, allowing to invoke scala-cli with the linking and compilation flags for a given set of dependencies, alongside any other flags.
For example, to build the project from scratch, I'm basically constructing the following Scala CLI command:
$ cs launch sn-vcpkg --contrib -- \
    scala-cli raylib -- \ # Arguments passed to sn-vcpkg
    package src raylib-bindings resources -f -o ./little-fingers # Arguments passed to Scala CLI invoked by sn-vcpkg
And on my machine it will result in finally invoking the following Scala CLI command:
scala-cli package src raylib-bindings resources --native-mode debug -f -o little-fingers --native-compile -I$HOME/Library/Caches/sbt-vcpkg/vcpkg-install/arm64-osx/lib/pkgconfig/../../include --native-linking -L$HOME/Library/Caches/sbt-vcpkg/vcpkg-install/arm64-osx/lib/pkgconfig/../../lib --native-linking -lraylib --native-linking -lglfw3 --native-linking -framework --native-linking Cocoa --native-linking -framework --native-linking IOKit --native-linking -framework --native-linking CoreFoundation
If you squint, you can see in there all the arguments required to build an application using Raylib and glfw.
Some of the readers might exclaim "you could've just used Mill for this, you even have a Vcpkg plugin for Mill! Why wouldn't you just use Mill?" but their lonely screams can barely be heard.
The turtles
It's CLIs all the way down.
All this so I can just run ./build.sc app-debug and have it be just a little slower, but capable of
bootstrapping everything I need to build the binary.
Every single step here felt like a reasonable, rational choice, and yet when you look at the system as a whole you begin to wonder if it was easier to just hardcode some flags and move on. But what's the "fun" 1 in that.

Conclusion
This was a very enjoyable project, despite my general dissatisfaction with the build process.
All of the tools involved in the process have shown their strength, even though it took time to adjust to the slower feedback loop one gets with Scala Native linking.
That said, the number of times I re-linked the app went down dramatically once I stopped debugging the rendering functions, and focused on pure Scala code - the compiler made it a breeze and I didn't re-link until I wanted to see the final results in action.
One thing I did not pay much attention was performance. It seems that
performance should be abysmal, given how expensive all the copying and allocations
are. But in my tests in both debug and release-fast configurations I didn't
observe any issues, and when I did a very unscientific profiling using Samply,
the Scala-specific parts were far from being the main offender
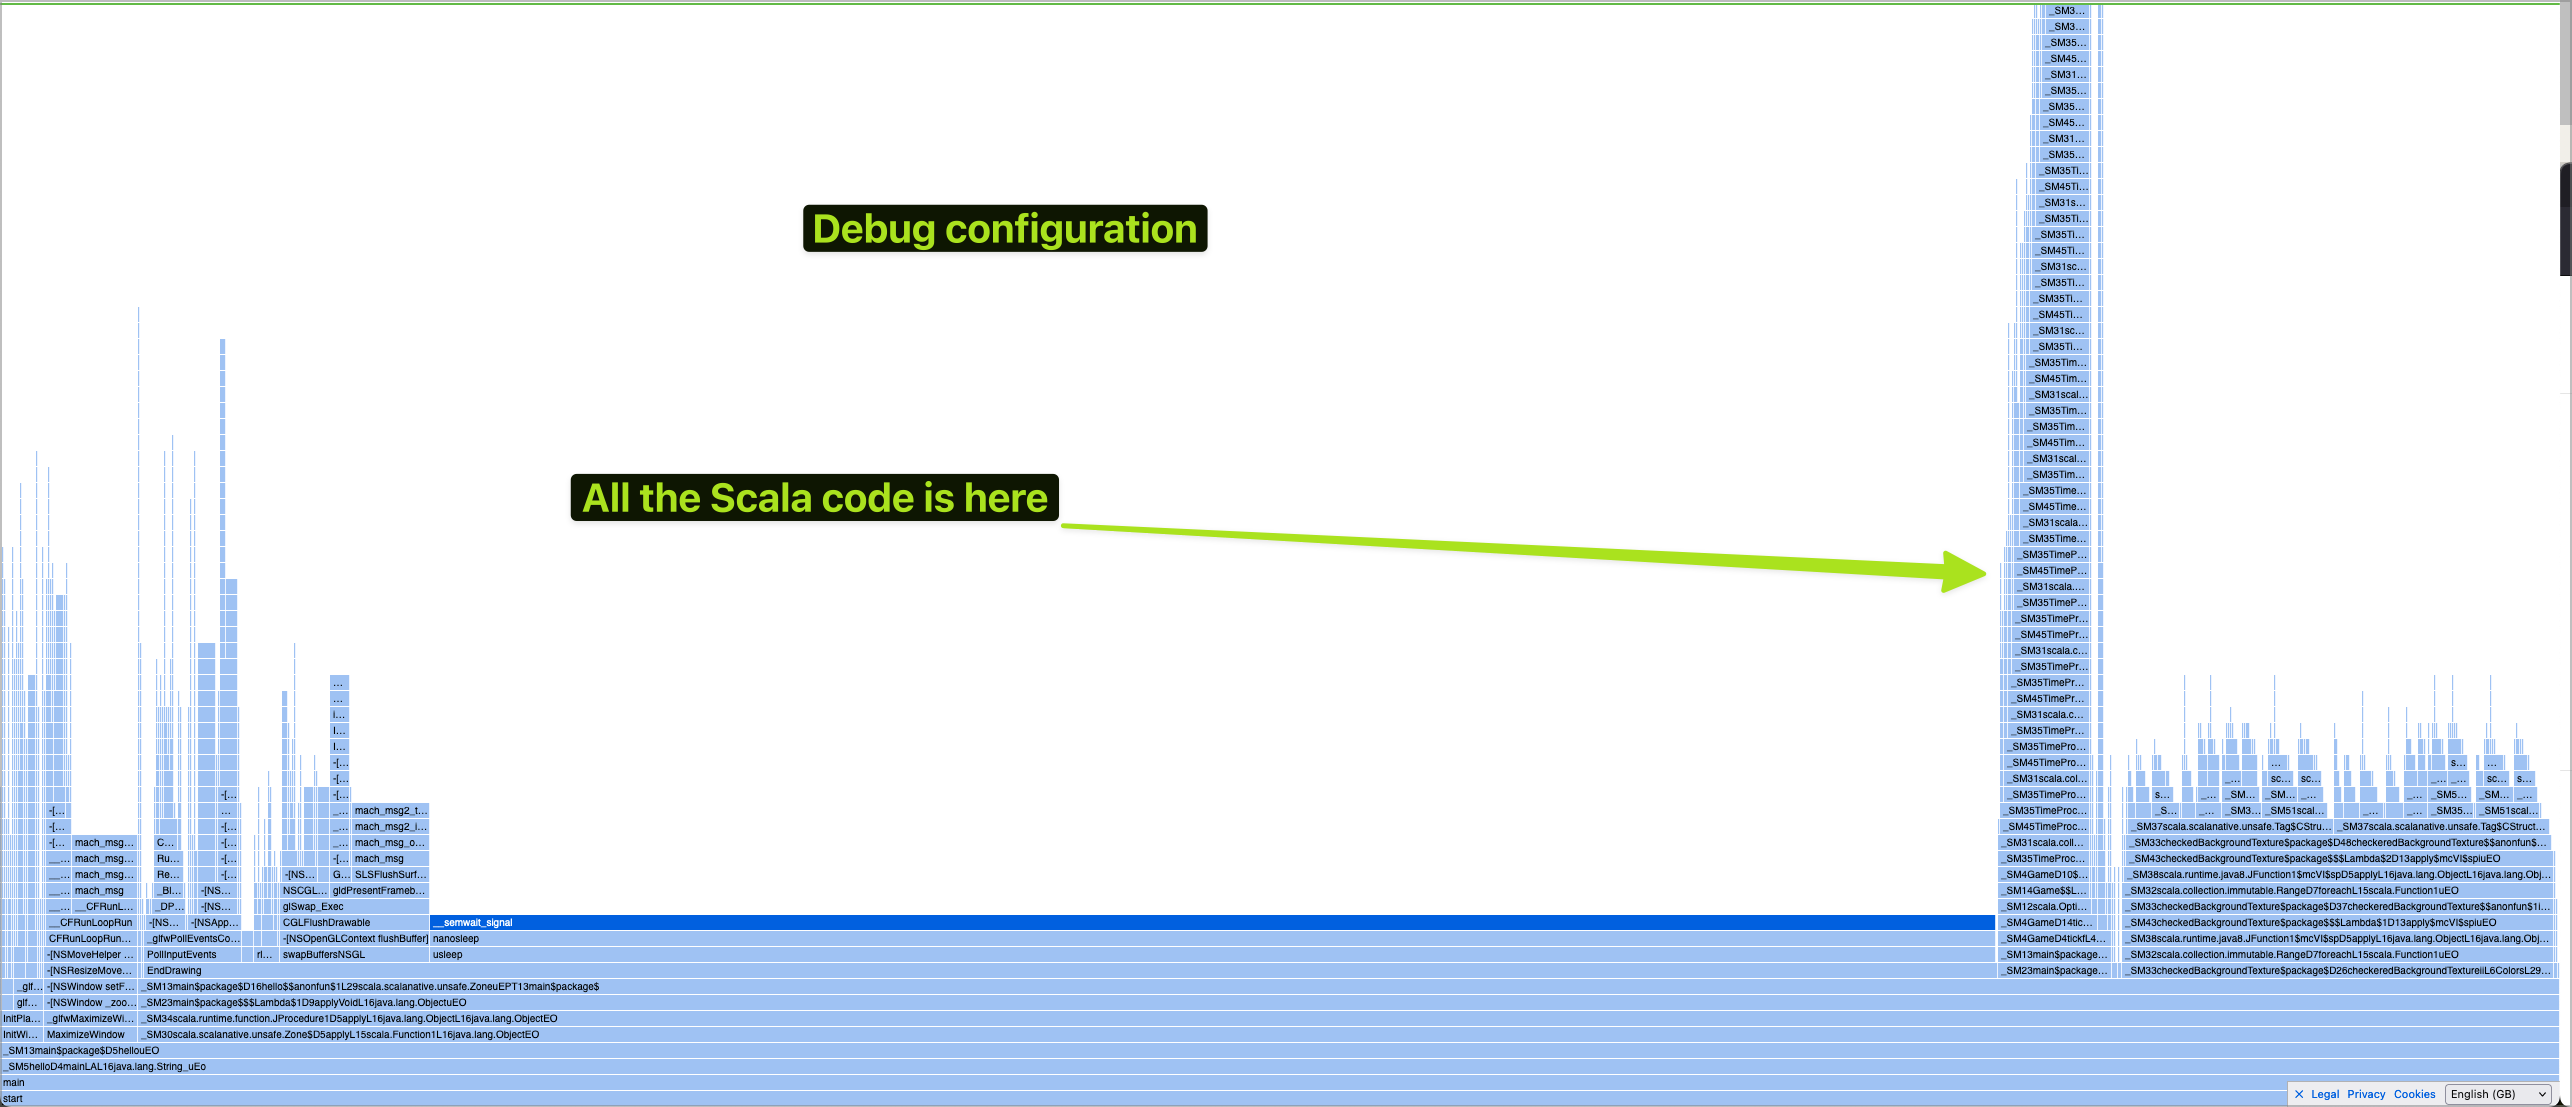
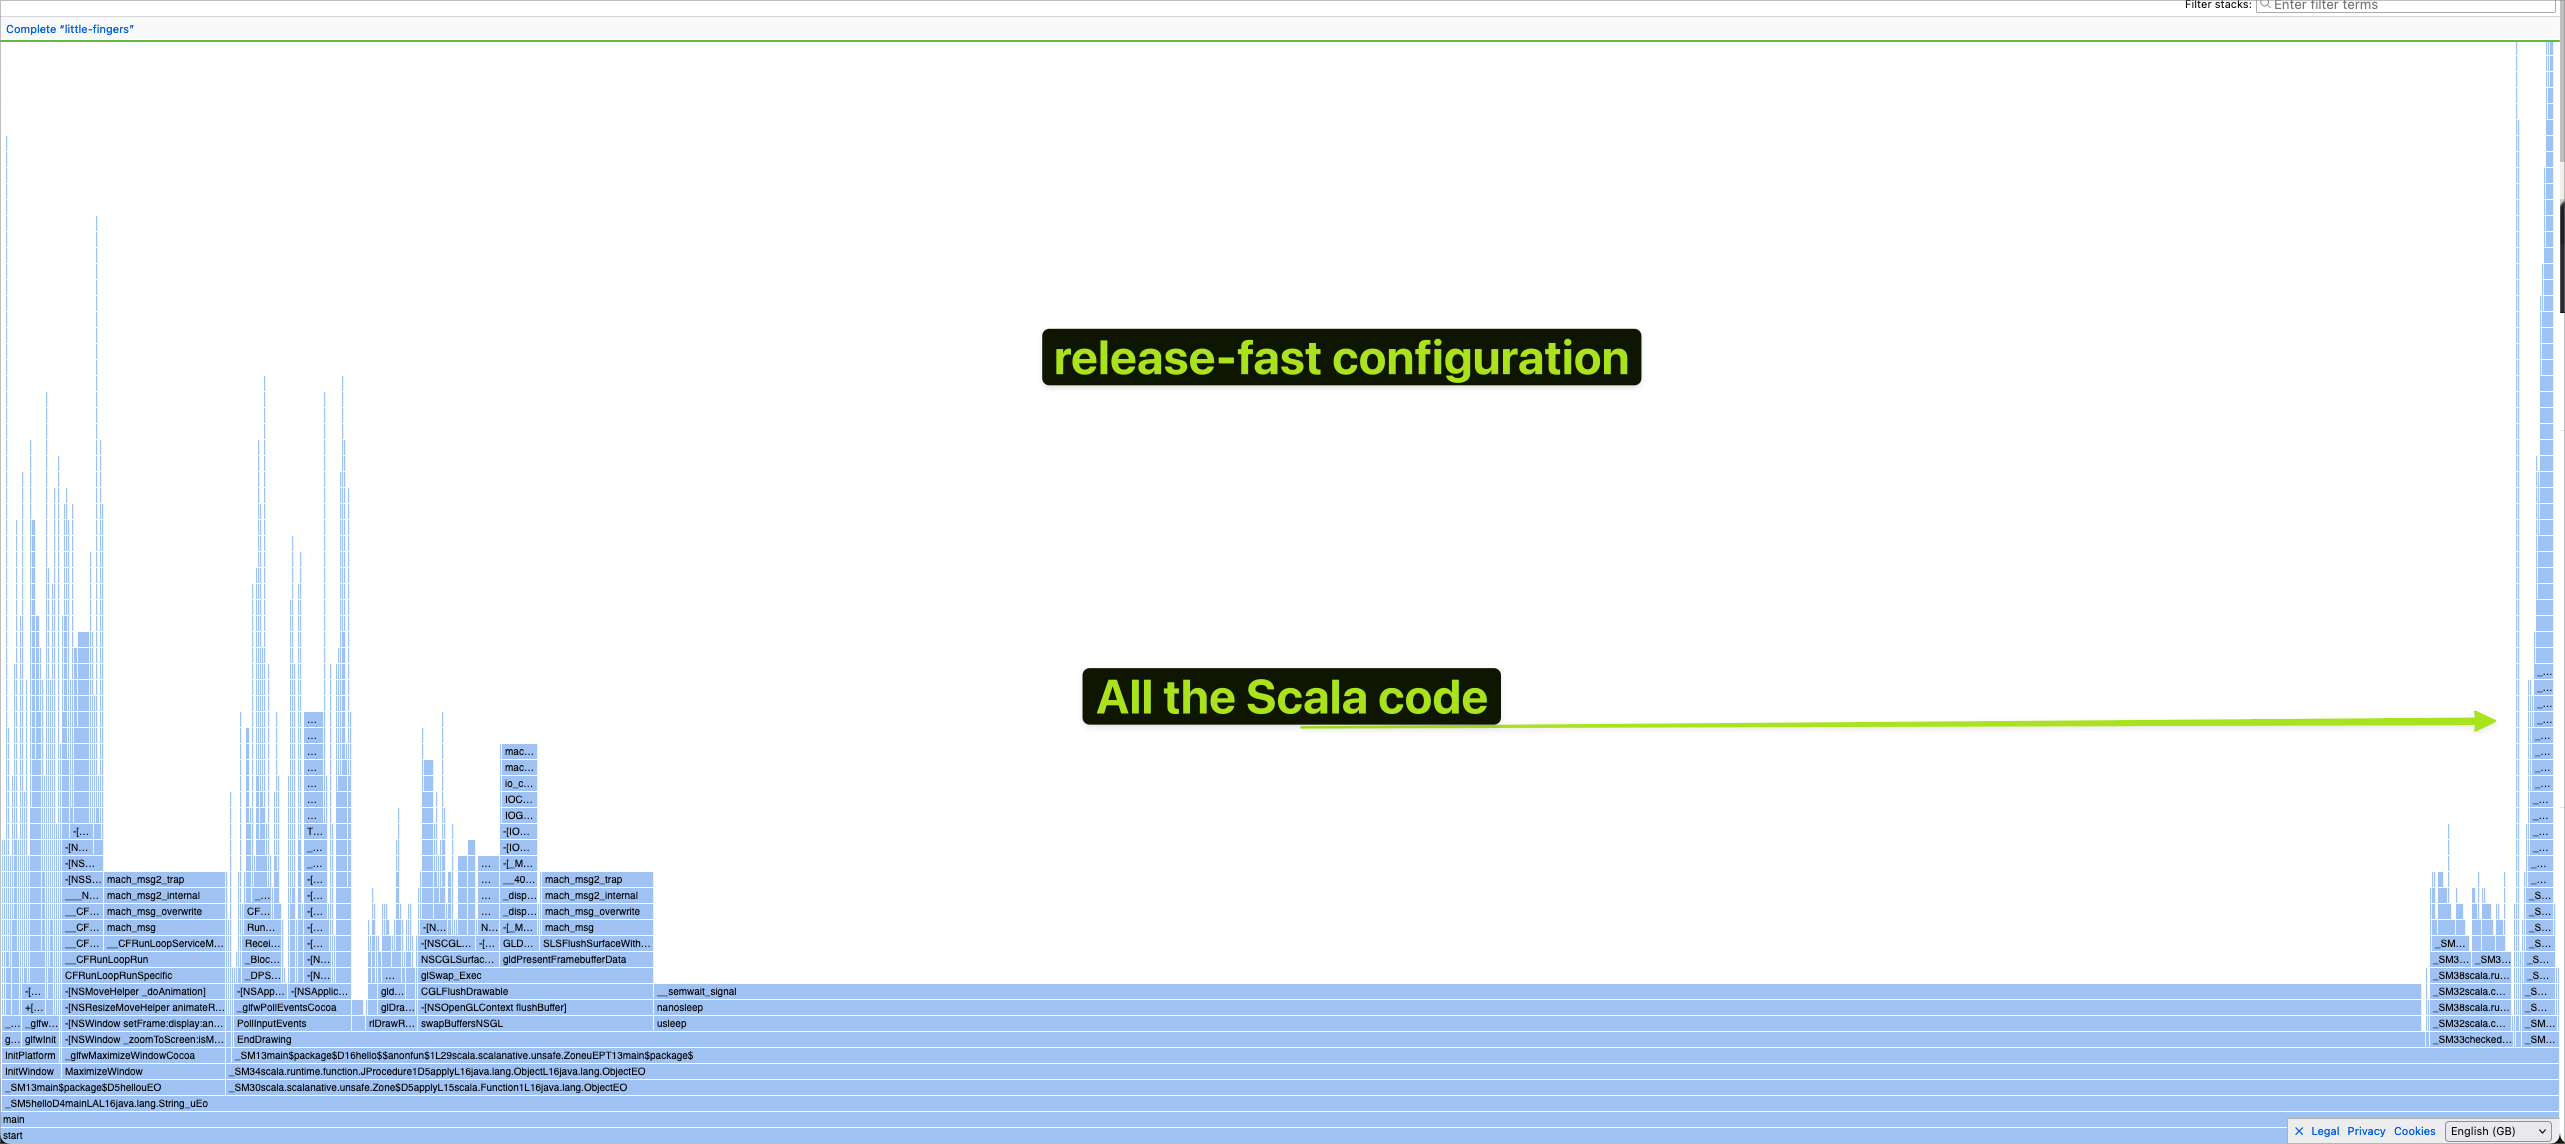
Nevertheless, I would like to revisit the performance and see the true cost of both the binding wrapper functions and the constant copying.
-
if in your mind explosive diarrhoea is also classed as "fun"
↩